Showing posts with label Stars. Show all posts

Saturday, November 21, 2020

Window stars

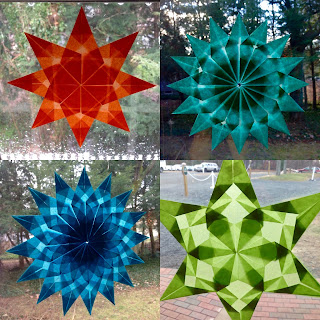
In November, we fold stars to decorate the windows of the school for the holiday fair. They are not difficult! Come learn and fold for yourself. You need waxed kite paper (sold in large sheets or in 6" square pads) or tissue paper you can cut into squares or rectangles.

Beautiful instructions: https://denverwaldorf.org/wisdom-of-waldorf/waldorf-window-stars/

    Two different videos of making that star: 
 
 
Star by Andrea & Fenton 2020
Helpful videos on how to fold two types of stars using rectangular paper.
9:00 she begins gluing points together
12:00 she does the tricky part of attaching the last piece to the first. 

Her video for 8 pointed star:
 
 
16-pointed rainbow star by Andrea & Fenton, 2020


Another post with links to many beautiful patterns: http://andamentoblog.blogspot.com/2013/12/window-stars.html

A wreath of five pointed stars! http://invitationtothebutterflyball.blogspot.com/2014/02/new-window-star-tutorial-with-printable.html

Sunday, November 25, 2018

Straw stars


Date: November 29, 2018
What to bring: fine thread (any color, or metallic), xacto knife, scissors
Optional: tools to split straw and to hold in place while tying (see school store to purchase)
What will be provided: crafting straw, lots of samples, basic instruction

You can make something simple like this:


Or this for the ambitious:

The fine motor part of this craft is weaving the tiny thread in and out between the straw. 

Our school store will be selling tools to hold all pieces securely while tying the straw. You can use an exacto knife to cut the straw and flatten with an iron, and there are tools for splitting straw as well. You can use the straw as-is but it will not have the fine detail as above or in video linked below. 

Video instructions for Swedish straw ornaments:

https://thestrawshop.com/ also sells materials and tools for making this type of stars. 

We look forward to seeing you!

Update

There are so many styles! Here are some we made 11/29/18 using split straws and the tool to hold straws in place while we tie the thread to hold them for good. Thanks to Wendy for leading us and all the crafters for trying it out!

Below, another variation seen in the EC building window in 2016.


Thursday, November 30, 2017

Shaker stars

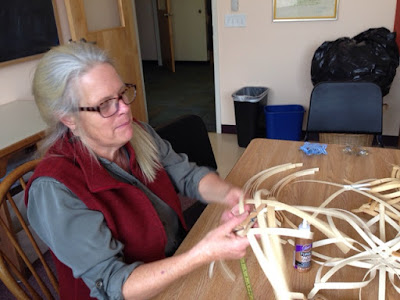
Back by popular demand, Kristin Hall will teach these basket-like starts again on Thursday, December 7, 2017.

No cost craft
Materials will be provided. Please RSVP to the School Store by 12/6 so we have enough basket reed ready for everyone.

We will have tools to share, but if you have them please bring:

  • tape measure or ruler/grid, 
  • scissors or clippers, 
  • tacky glue like Alene's (available at Joanne's, Michael's, etc.), 
  • lots of clothespins! (You'll probably use 12 or even 24, and can take them back home to use afterwards.)
February 4, 2016
We had fun making them and good conversation across the "generations" of parents -- 24-year veteran Hartsbrook parent Kristin and those of us with young children. Kristin had learned these stars from a parent named Susan, when her oldest daughter was in 2nd grade [Kristin please correct any facts!] and she was glad to teach us so we can carry on making them. A few people were sorry they missed this session -- maybe we can do it again.

Materials & Equipment

  • 1/2 inch basket reed (ash):
    Each large star needs 4x20”+16x19” = 384” = 32’
    Each smaller star needs 4x12" + 8x10" = 128" = 11'
    Note: Depending on lengths of reed in an order, might need to order extra to have correct lengths for stars.
  • Scissors are fine for cutting the reed
  • Tape measure
  • Quilting rulers or mat grid make the measuring easier!

Instructions

Soak reed so it's bendable but not too wet for tacky glue to stick. (10-20 minutes?) Have lots of clothes pins on hand to hold each intersection in place while glue dries.

These stars are made of two woven sides attached perpendicular and meeting at the points. So make two cross-woven shapes then attach them at the points.


Smaller star

This smaller, simpler star is made with  
4 pieces 12" long
8 pieces of 10" reed

Large star

4 pieces 20" long for centers
16 pieces 19" long

1. Cut softened pieces of reed to length
2. Measure with a ruler or quilting grid and mark the center of each reed lightly with a pencil.
3. Begin with two long pieces crossed at the middle, then weave two more shorter pieces on each side/direction.

Related link: https://shakervillageky.org/event/holiday-reed-star/


Materials cost should be less than $3 per star.


Thursday, December 1, 2016

Dodecahedron star lanterns

Dec 8: Star lanterns

If you have some, bring:
watercolor or other heavy paper
watercolor paints or crayons
metal ruler and knife
cutting board
glue
Paper clips 

RSVP helps me have enough materials. 

The instructions are here:

I plan to try hexagons and six-pointed stars or octagons and eight-pointed stars, but those polyhedrons may not lend themselves to the magic of this dodecahedron lantern. Geometry will be relevant but optional conversation topic!