Thursday, November 30, 2017

Shaker stars

Back by popular demand, Kristin Hall will teach these basket-like starts again on Thursday, December 7, 2017.

No cost craft
Materials will be provided. Please RSVP to the School Store by 12/6 so we have enough basket reed ready for everyone.

We will have tools to share, but if you have them please bring:

  • tape measure or ruler/grid, 
  • scissors or clippers, 
  • tacky glue like Alene's (available at Joanne's, Michael's, etc.), 
  • lots of clothespins! (You'll probably use 12 or even 24, and can take them back home to use afterwards.)
February 4, 2016
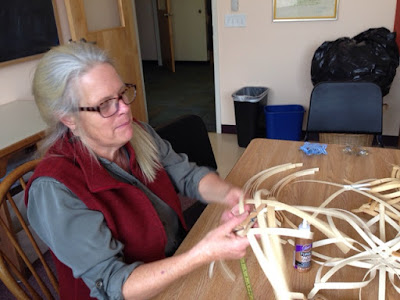
We had fun making them and good conversation across the "generations" of parents -- 24-year veteran Hartsbrook parent Kristin and those of us with young children. Kristin had learned these stars from a parent named Susan, when her oldest daughter was in 2nd grade [Kristin please correct any facts!] and she was glad to teach us so we can carry on making them. A few people were sorry they missed this session -- maybe we can do it again.

Materials & Equipment

  • 1/2 inch basket reed (ash):
    Each large star needs 4x20”+16x19” = 384” = 32’
    Each smaller star needs 4x12" + 8x10" = 128" = 11'
    Note: Depending on lengths of reed in an order, might need to order extra to have correct lengths for stars.
  • Scissors are fine for cutting the reed
  • Tape measure
  • Quilting rulers or mat grid make the measuring easier!

Instructions

Soak reed so it's bendable but not too wet for tacky glue to stick. (10-20 minutes?) Have lots of clothes pins on hand to hold each intersection in place while glue dries.

These stars are made of two woven sides attached perpendicular and meeting at the points. So make two cross-woven shapes then attach them at the points.


Smaller star

This smaller, simpler star is made with  
4 pieces 12" long
8 pieces of 10" reed

Large star

4 pieces 20" long for centers
16 pieces 19" long

1. Cut softened pieces of reed to length
2. Measure with a ruler or quilting grid and mark the center of each reed lightly with a pencil.
3. Begin with two long pieces crossed at the middle, then weave two more shorter pieces on each side/direction.

Related link: https://shakervillageky.org/event/holiday-reed-star/


Materials cost should be less than $3 per star.


Thursday, October 12, 2017

Crafters walk the land

On Thursday, October 19, at the usual crafting time, a bunch of regular crafters will be joining the Land Stewardship program walk on Hartsbrook land. See the weekly Bulletin for details, and RSVP directly. We hope to locate plants for natural dyes, and materials for making baskets, if not other ideas for crafting from our local natural resources. See you there!

There will still be some crafting in the handwork room as usual, please bring your projects and join in!

Monday, September 11, 2017

Dyeing silks

Dyeing silks is our craft for virtual community crafting September 21st, when the school is closed for Rosh Hashanah (Jewish new year celebration). L'shanah tovah! A happy and sweet new year! (If celebrating, you can certainly dye silks any other days.)

The School Store is selling white silks 35x35" of a nice, heavier quality to use for dying playsilks.

The idea is to have time to make a plant dye and leave the silk in it a while so the color is as strong as you want, which would take longer than our time together on Thursday mornings. Around this time of year, the early childhood program includes dyeing golden silk flags for their Michaelmas celebration (this year on September 28th). If you don't know about Michaelmas, please come to crafting and we will talk about how Hartsbrook celebrates, historical background, and more universal experience of the season.

Thank you to Nicole Romer, parent, handwork teacher, and owner of Heavenly Hues, for sharing her instructions for how to plant dye animal fibers!

These are from my notes last Thursday. Please forgive me as they may not be clear and possibly not exactly accurate! If you have differing notes or expertise, please comment below and/or email me to fix!

To dye silks

  1. Mordant the silk first, for a richer color and for color to last longer.
    To mordant:
    1. In a stainless steel pot large enough for fabric to move around, dissolve 2 1/2 Tablespoons of alum per 1 pound of silk. (For one silk, about 1 teaspoon.)
      Note: Alum is short for Aluminum Potassium Sulfate which is similar to or also called pickling salt. The school store has small amounts available if you don't want to buy the large quantities in which it is usually is sold.
    2. After 10 minutes, add cold water and fabric.
    3. Slowly bring to 200F, which is a simmer, not full boil (212F).
    4. Keep at low simmer for 45 minutes.
    5. Cool overnight, keeping fabric wet in a plastic bag to cure (it needs to be wet for dyeing anyway).
  2. Prepare the dye bath (instructions for dyeing with goldenrod below, or use food coloring and vinegar, or KoolAid. It's possible you can use KoolAid without bothering with mordant step). You can do this step while the mordant is simmering, if you have enough pots!
    To prepare goldenrod dye:
    1. Fill a pot with flowers, stems, leaves (cut stems just below where the yellow flowers stop).
      If you can still find the yellow flowers around meadows in the valley, collect them (some leaves ok) to fill a small pot. Goldenrod can make a bright sunshine yellow. If you have marigolds or turmeric you could add those for slightly different yellow color.
    2. Cover with cold water and let sit overnight.
    3. Bring to a boil and simmer, covered, for an hour.
    4. Cool overnight.
    5. Using an old t-shirt, strain out the plant matter, put the dye bath back into a pot.
  3. To dye and cure the silk:
    1. Rinse the mordanted silk in cool water.
    2. Put the fabric in the goldenrod bath.
    3. Slowly warm up to 180 degrees (hot but not burning when you dip your figure quickly in) and simmer low for 45 minutes.
    4. Cool the fabric in the dye bath for 1-2 days.
    5. Hang it to dry in the shade.
    6. Wash by hand with vinegar or mild soap, and optionally iron when damp.

On September 28th, it would be lovely to have everyone bring in silks we dyed to see them all together.


 Left to right: Goldenrod, goldenrod with raw pokeberry after, cooked pokeberry, and raw pokeberry. (The raw pokeberry washed out the most after drying. There's something about adding cream of tartar that might help?)

Welcome crafters 2017-18!

While Waldorf Education and crafting go hand in hand, sometimes parent groups ebb and flow. This iteration of the Hartsbrook community crafting group is now in its 3rd year, launched by the crafting sessions hosted by Amanda Viles and Magdalena Toran in fall 2015 for early childhood parents to  make holiday fair crafts together. We are excited to have some parents new to the school joining us this year. Welcome!

As is our tradition, we will make small crafts in September and October for the Treasures in a Haystack and the Children's Bazaar activities at the holiday fair in November. We may prepare some kits for parents to work on at home, if requested. We use materials we can find, from acorns to thread, and always welcome contributions of felt, wool roving, yarn, or found natural materials like pinecones. We do have an abundance of small, tight pinecones from a previous year, so ideas for what to make with them would be handy.

Check the schedule on the right of this blog page for each week's activity plan. Usually each has a link to a post with details about the craft and what materials and tools are needed. Sometimes we coordinate ordering supplies for certain crafts from our school store.

If you have questions or suggestions, please contact parent Jennie Abbingsole (or comment here).

Tuesday, May 9, 2017

Weaving


May 17, 2017 - We will weave various materials into various forms, from mats to decorations to baskets. Please bring any sticks, vines, grasses, yarn, ribbon, wool, cotton yarn, strips of fabric, wood, nails, cardboard, etc.
  • Fiber rush baskets (making new or finishing) 
  • Dream catchers (making new or finishing)
  • Stick weaving
  • Egg baskets
  • Simple loom weaving (we have 4 simple looms you can use)


Thursday, April 27, 2017

Kites

May 11, 2017

Come fly with us! Bring sticks, string, and kite paper if you have it -- we will also have some available. We will be working outside under the canopy by the front door of the lower school so we have easy access to the field for flying the kites!

Some ideas:

Monday, April 3, 2017

Needlebooks

May 4, 2017 we will begin needlebooks -- useful for yourself, lovely as a gift. Whether or not you choose to decorate the cover, you can sew together a few "pages" of felt to stick needles in, add a pocket for tiny scissors, and other embellishments we inspire from each other and our Internet searches for ideas beforehand. If you have a needlebook you like, please come tell us why you like it so those of us making new ones can benefit from your design and experience.

What to bring (any or all):
  • Felt
  • Fabric
  • Needle(s)
  • Embroidery thread
  • Buttons or other knick knacks to sew on
  • Scissors
  • Design ideas


For credits of pictured needlebooks see the full page post:
http://www.museofthemorning.com/museblog/2014/weekend-inspiration-amazing-needle-books/

Monday, March 6, 2017

Knitting bee

Bring your knitting project, your needles you've never used before, your interest to learn... and we will all knit together! We do this about once a month, so far, but some folks have expressed interest in an ongoing knitting group.

In Waldorf schools, children learn to knit in First Grade, so you may want to join your child in learning, brush up on the skills you learned from a relative when you were young, or tackle a knitting challenge in good company.

Beginners are always welcome. If you are buying needles, a pair of big ones size 10 or so are good to start. We usually have yarn to share.

We often have experienced knitters who can help fix mistakes, read a pattern, or suggest a good yarn for your project.

Candle decorating

Please bring a candle to decorate at our April 6, 2017 crafting session.


Candles are a central part of the Waldorf meal blessing, and are reverently used in both Passover and Easter celebrations. While Hartsbrook is not allowed to use lit candles on campus, you may enjoy the pleasure of them at your table at home. Working with wax to create something beautiful is a very therapeutic activity and you can also do it with your children at home.

You can decorate tall taper candles or larger diameter pillar candles, or even votive candles. Beeswax is particularly lovely but not at all required.

The school store sells the beautiful thin wax we can use to adorn candles. (See the sample pillar already decorated for spring at the store, open Fridays in Hartsbrook Hall.) 

We will have assorted colors of wax available for sale at a discount at our crafting session:
  • 50 cents for half sheets
  • $1 for full individual sheets
  • $10 for a full box of assorted colors
NOTE: If you have a design in mind and need certain colors, please check with Wendy at the school store to be sure she has the quantity and colors you want.


Thursday, March 2, 2017

Wet felted eggs and chicks

March 16, 2017

Parent will lead us wet felting eggs and little chicks to put inside! The school store will provide wool roving for your eggs and chicks in exchange for each participant making a few little yellow chicks to give back.


March 24, 2016

Sunday, February 26, 2017

Fiber-rush baskets

Jennie will teach how to make these baskets of fiber rush (paper fiber), which doesn't need to be soaked like wicker basketry, and it comes in many colors!

March 23 and 30, 2017 (two sessions per basket) 
$18 materials fee ~ contact the School Store by 3/3 to register!


We will use 5/32" diameter rush, which is sold by weight. One medium basket probably uses 1 lb of rush, so it's fun to get a couple of colors and share. You can bring your own materials or order from the School Store (use the email address at the bottom of that page if you don't see a specific link). If you know a local source, please let me know; otherwise, The Caning Shop http://www.caning.com/html/product/FIRUSHC.html in Berkeley, CA is the only source I've found for the colored rush. (Craft brown and yellow are widely available and less expensive.)


Sunday, February 5, 2017

Valentines with young children

Valentines for classmates in early childhood can be very basic, and are not too difficult to have the children make themselves. Making enough for all the children and the teachers in the class may feel like a lot, and it's not required. It's definitely not something to lose sleep over! But it can be fun if you have a little time and just a few materials. If you don't have materials, ask your Class Parent for suggestions.

A few ideas:
Painted hearts 
Have your child paint a few paintings, or use some you already have, and cut into heart shapes (adult or child). For the child to cut, the paper can't be too thick or it's too difficult. 

Potato stamp (see photos)
Potato cut in half, cut out a shape with a cookie cutter and stamp with paint on paper, either large paper to cut into hearts or squares or already-cut valentine size.  

Sew paper
You or your child can hole-punch around the edge of a colored paper shape and then sew with yarn -- with big holes and big yarn no needle required. 

Special pens, crayons, or glitter on paper or cloth

Collage
Glue small pieces or paper onto a larger heart shape, etc. 

Valentines are preferably homemade and simple. Please do not address them to individual children as it is so much easier for each child to give everyone a card without needing to figure out which one is meant for whom. Children can of course write their own name on their cards if they wish.